Key Functions
- Navigation and ability to view all Engagement details
- Ability to Add an Engagement
- Ability to Edit, Delete, Archive an Engagement
User Flow
Navigation and ability to view all Engagement details
- When the user clicks on "Add new Engagement ", the new screen displays a four-step process.
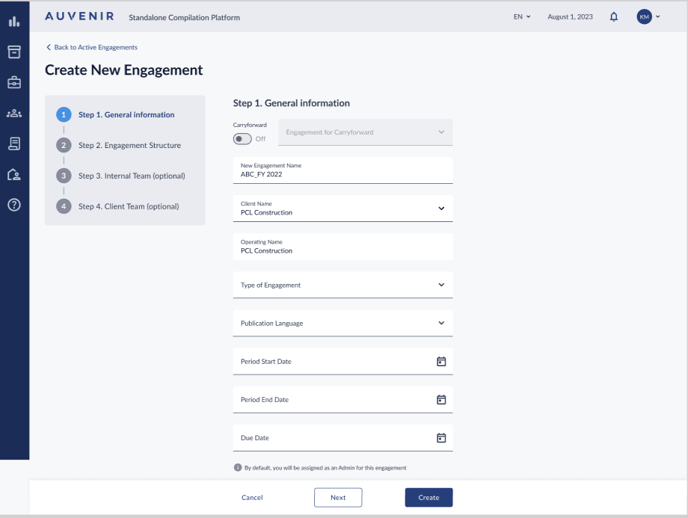
Step 1 "General information"
This step allows the user to enter new engagement details. For new Engagement creation, the following fields will be filled by the user:
- New Engagement Name
- Client Name
- Operating Name
- Type of Engagement
- Publication Language
- Period Start date
- Period End date.
There will be a "Cancel" button to discard changes and warning pop-up will be displayed to user before discarding changes, there will be "Next" button to move to the next step and "Create" button to save current changes and defer filling other steps to later point.
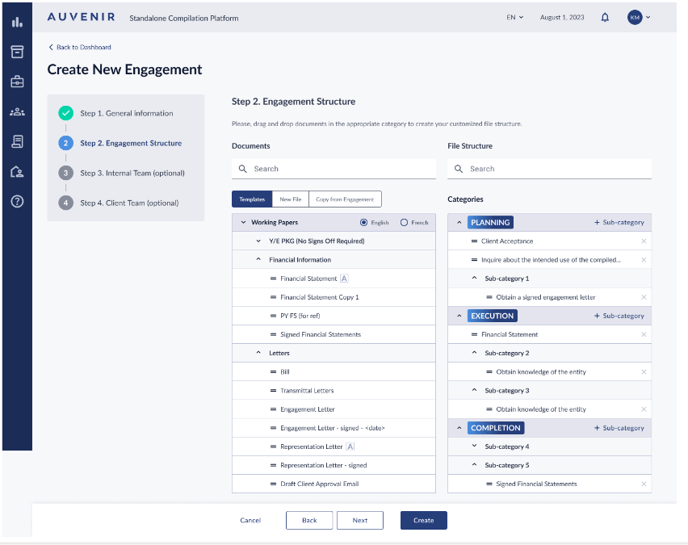
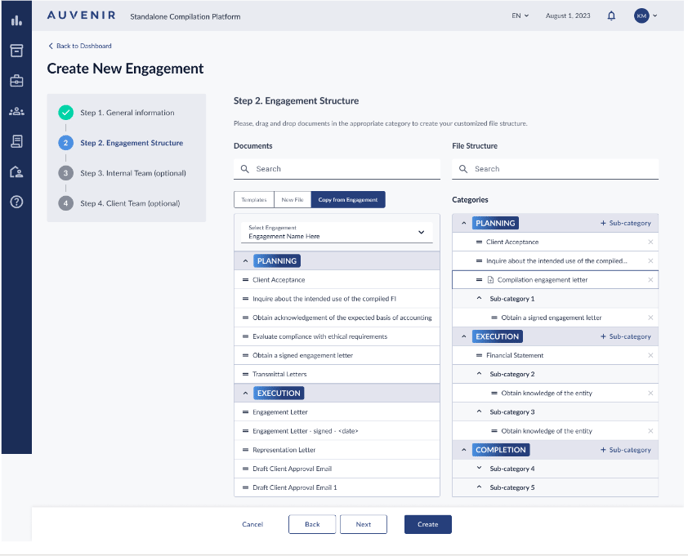
Step 2 “Engagement Structure”:
- The user should be able to navigate to the 'Create New Engagement' flow, arriving at the 2nd step named 'Engagement Structure'.
- The user should be able to identify their current position in the process, as they are greeted with a header that reads "Step 2. Engagement Structure."
- Below the header, the user should be able to find clear guidance from a subtext stating "Please, drag and drop documents in the appropriate category to create your customized file structure," aimed at providing a concise directive for their task.
- On this page, the user should be able to see two distinct sections side by side: 'Documents' on the left and 'File Structure' on the right, each clearly labeled with their respective titles.
- Just below the titles of these sections, the user should be able to access search bars, strategically placed to facilitate quick and easy navigation within each section.
- Within the 'Documents' section, the user should be able to interact with three tabs labeled 'Templates', 'New File', and 'Copy from Engagement', with 'Templates' set as the default and active selection.
- Beneath these tabs, the user should be able to explore a grid of collapsible rows, showcasing various template types.
- Moving over to the 'File Structure' section, the user should be able to notice a header that says 'Categories', followed by a hierarchy structure. When user selects the Carryforward engagement option in Step 1 this left grid will get preloaded with the Category and subcategory information from the engagement selected for carry forward, as well as each categories attachment. User can then add on to or edit or delete from this structure further as needed.
- In this grid, the user should be able to identify main rows showing the categories of 'Planning', 'Execution', or 'Completion', each displayed within a distinct blue box to the left of the row.
- To the right of these categories, the user should be able to find a button labeled 'Sub-category' accompanied by a '+' icon, ready to be clicked for adding subcategories within each main category.
- The user should be able to drag templates from the 'Documents' section and drop them into any main category or subcategory within the 'File Structure' section. User should also be able to do a reverse drag n drop allowing the user to bring back the template from the left to the right grid.
- There will be a 'X' delete icon appearing on the category and subcategory which is preloaded from the carry forward engagement allowing user to delete them if no longer needed in the new engagement.
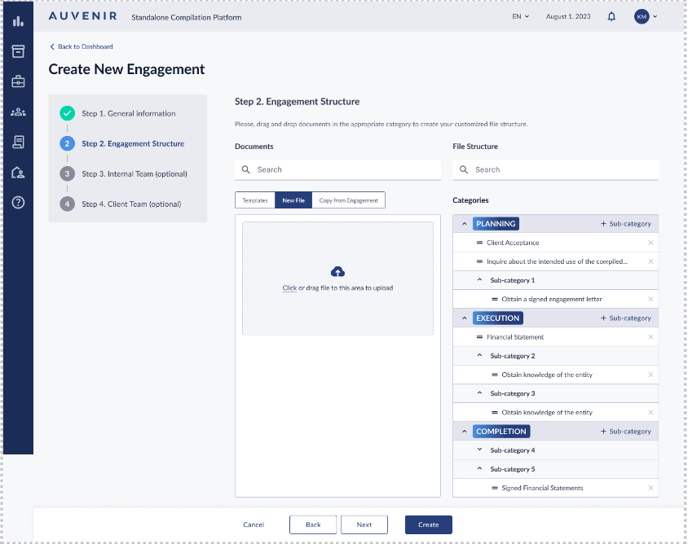
- When the user decides to click on the 'New File' tab in the 'Documents' section, they should be able to witness the grid of templates transforming into a box stating "Click or drag file to this area to upload".
- After uploading a file, the user should be able to see the file listed below the upload box, complete with its file extension, an edit button for name adjustments, and an 'X' button for removal. Any uploaded file is treated like a non-digitalized template.
- Just like the templates, the user should be able to drag the uploaded files into the 'Categories' section within the 'File Structure' area.
- If the user opts to click on the 'Copy from Engagement' tab, they should initially be presented with a dropdown menu, prompting them to select an engagement from a list of available options.
- By default, the grid of rows beneath, which displays the corresponding categories and templates, should remain hidden until the user makes a selection from the dropdown menu. Note, the selection of this menu is optional, and the user can still move onto the next step. The dropdown menu will consist of engagements previously selected in step 1. If the user did not select the option to carry forward an engagement in step 1, the entire panel will be blank for the "Copy from Engagement" tab, indicating that the user is creating the structure from scratch.
- Once an engagement is selected, the user should be able to observe the grid of rows revealing itself, mirroring the 'Categories' section with the Carryforward, and showcasing the templates associated with each category, all of which are ready for the drag-and-drop functionality.
- Just like with other templates, the user should be able to drag and drop these into the 'File Structure' section, ensuring a seamless and user-friendly experience across different functionalities of the engagement creation flow.
- Regardless of the tab the user selects in the 'Documents' section, the search bar should remain consistently in place, ensuring uninterrupted functionality.
- Below the main sections, the user should be able to find a series of buttons: 'Cancel', 'Back', 'Next', and 'Create'.
- Clicking 'Cancel' should prompt a dialog box, seeking confirmation from the user to cancel the entire engagement flow.
- Opting for 'Back' should navigate the user back to step 1 of the flow, ensuring no changes are saved.
- Selecting 'Next' should propel the user forward to step 3, simultaneously saving all changes made.
- Finally, clicking 'Create' should finalize the engagement, noting that steps 3 and 4 of the 'Create New Engagement' flow are optional initially, and thus, the engagement can be created at this stage.
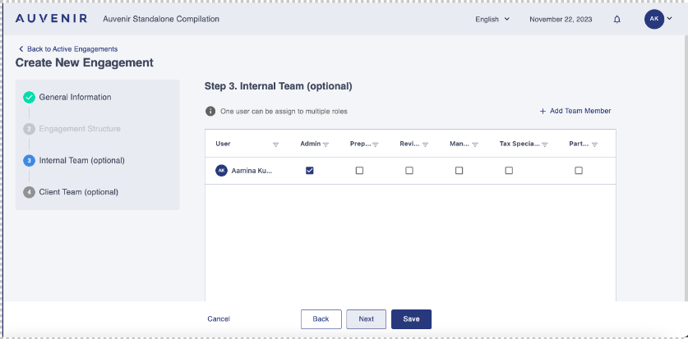
Step 3 "Internal Team": In this screen, all the pre-existing user list will be displayed along with the roles. Additionally, to add new team members, the "Add New Team member" button will be available. One user can be assigned multiple roles. On each user row, there will be a remove button available to remove user access to that engagement. There will be a "Cancel" button to discard changes and warning pop-up will be displayed to user before discarding changes, there will be "Back" button to go back to previous step, "Next" button to move to the next step and "Create" button to save current changes and defer filling other steps to later point.
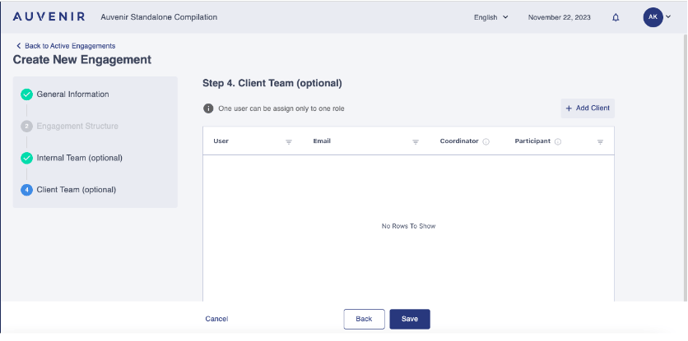
Step 4 "Client Team": In this screen, all the pre-existing Client usernames and Email ID will be displayed along with the roles. Additionally, to add new client team members, the "Add Client team" button will be available. Once the user request is sent to the client team, the user details will be greyed out indicating that the client team user is yet to accept the request. One Client user can be assigned one role, which is either a "Participant" role or "Co-Ordinator" role. On each user row, there will be a delete button available to remove user access to that engagement. There will be a "Cancel" button to discard changes and a warning pop-up will be displayed to user before discarding changes, "Back" button to go to the previous step, and "Create" button to save current changes.