Key Functions
- Navigation and ability to view and update user’s signature into the application
- Ability to configure specific user’s notification preferences within the user profile section, to customize updates related to the application activities
User Flow
Navigation and ability to view and update user’s signature into the application
- When you click on the profile icon on the top right of the top navigation bar, a dialog will open with a name, email, and two options: "User Profile" and "Log out". A user can only access and manage their own profile information and cannot access the information for another user. This User Profile navigation will be the same for Internal Users and Client users.
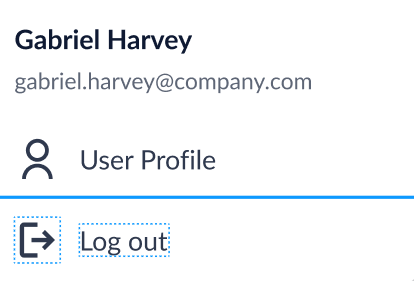
- When you click on "Log Out", you will be logged out of the application.
- When you click on "User Profile", you will be brought to the User Profile screen, with the default sub tab being "Your E-sign".
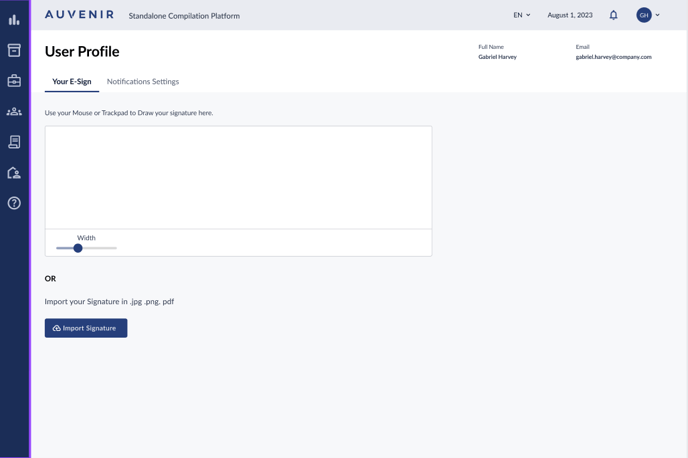
- When you access the “Your E-sign” tab in the User Profile, you will be brought to the e-signature section.
- Below the tabs, a subtext should read, "Use your mouse or trackpad to draw signature here."
- Directly below the subtext, there should be a signature area where you can utilize your mouse or trackpad to draw an electronic signature.
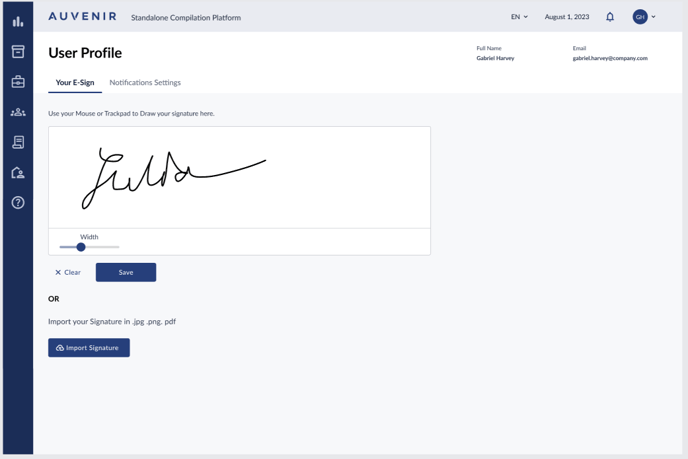
- As soon as you begin drawing their signature within this field, "Clear" and "Done" buttons appear at the bottom of the field.
- On clicking the "Clear" button, any drawn signature within the field should be erased. On clicking the "Done" button, the e-signature will be saved, and a status message should be displayed on the top right corner stating, "Success: Saved successfully!" The "Done" button will then disappear, while the "Clear" option remains. The signature will only be saved on clicking on the Done button, if user exits the screen without clicking on Done the signature will be lost.
- Beneath the signature field, there should be a slider that allows users to adjust the width of the stroke for the e-signature.
- Directly below the text area, a text should be displayed with the bolded word "OR" followed by the text "Import your signature in .jpg, .png, or .pdf"
- Underneath this text, a button labeled "Import Signature" should be present, followed by the text "Import your signature in .jpg, .png, or .pdf"
- Clicking the "Import Signature" button will trigger a dialog with the heading "Import Signature."
- Within this dialog, there should be an area for users to either click or drag a file to initiate the upload process.
- This dialog should also have two buttons at the bottom labeled "Cancel" and "Import."
- The moment you import a file, or as soon as you begin to draw, the text "OR" followed by the text "Import your signature in .jpg, .png, or .pdf" gets removed.
- Upon successfully importing a signature file, the signature field/text area at the top should display a preview of the uploaded signature.
- Directly below the displayed signature, the imported file's name with its extension type should be visible.
- Once a signature is imported, the "Import Signature" button should be replaced with two new buttons: "Clear" and "Import New E-Sign."
- Clicking the "Clear" button will revert the tab to its original view (before any signature was drawn or imported). "Clear" button will not appear when the text area is blank.
- The "Import New E-Sign" button, when clicked, will retrigger the "Import Signature" dialog box as described in points 9 to 11.
- If you try to upload a file with file type other than .jpg, .png, or .pdf an error message will be displayed saying 'File type not supported, please try again.'
Ability to configure specific user’s notification preferences within the user profile section, to customize updates related to the application activities
- Upon accessing the 'Notifications Settings' subtab in the user profile section, you will be able to see the options which will enable them to customize the notifications they wish to receive.
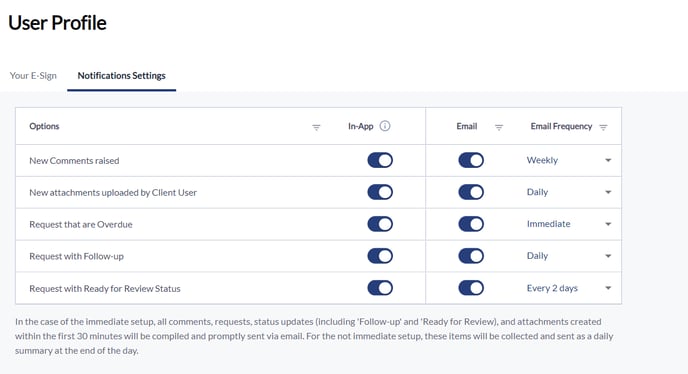
- The first column will be called "Options" and will list out all the notifications which the application will send out and can be customized by the user.
- The second column will be the "In-App" column. This will have a Yes/No toggle if an In app notification is sent for that option. If you select Yes then a notification will go out, if you select No you will no longer receive in-app notifications for the option.
- The next column will be the "Email" column. This will have a Yes/No toggle if an email notification is sent for that option. If you select Yes then an email notification will go out, if you select No you will no longer receive an email notification for the option. The Email column will also have an 'Email Frequency' column next to it which will allow user to customize the frequency for each option, this will be a dropdown with the values "Immediate", "Every Two Days", "Daily", and "Weekly"
- By default, the application will set daily notification frequency for E-mail and immediate notifications will be sent for in-app notifications. Overdue requests are compiled and sent at the end of the day for In app notifications.
- The cut-off time will be 6.00 pm EST i.e. all information as of this cut-off time will be collated and sent out in the email. Activity post 6.00 pm EST will be considered in the next day's emails as applicable. The emails will be sent out at 8.00 pm EST for activity concluded as of 6pm for that day. Weekly emails will be sent out on Friday at 8pm for cut off time Friday 6pm.
- Any changes you make by toggling the switches or by updating the dropdowns are auto-saved automatically.